Splunk
Send monitoring events from Splunk to BigPanda.
| Supported Versions | Type | Authentication Type |
|---|---|---|
| Splunk Enterprise, Splunk Cloud | Native App | Org Bearer Token |
BigPanda provides a native Splunk App to let you easily send Splunk alerts to BigPanda. The app provides a native Splunk alert action which will forward the Splunk alert to the BigPanda integration. The integration will take the Splunk alert and normalize it into one or more BigPanda alerts, one alert for each row in the search result.
Open Integration Manager
The Open Integration Manager is available for use with Splunk. For more information, see the Open Integration Manager documentation.
Notes for Updating Splunk to OIM
The Splunk OIM integration uses Time Based Alert Resolution to resolve alerts. Do not switch from the legacy solution if you require variable resolve times based on the Splunk expire time.
The legacy endpoint for Splunk is
https://integrations.bigpanda.io/splunk/alerts, and the new OIM endpoint ishttps://integrations.bigpanda.io/oim/splunk_v2/alerts.
Caution When Enabling Splunk
Splunk can be a noisy monitoring system. For customers using the BigPanda consumption based pricing model, it can consume large amounts of credits very quickly. For help configuring Splunk to be less noisy, see the Splunk FAQ.
Key Features
- Easily send Splunk alerts to BigPanda using the native BigPanda action in Splunk
- Keep your team focused on what matters with auto-resolution of Splunk alerts in BigPanda
- Simple & efficient management of all alerts going to BigPanda via custom alert management dashboard and search commands
- Customizable alert properties
- Proxy support for on-premises Splunk deployments
Auto-Resolve
Splunk does not send notifications when alerts are resolved. However, BigPanda will auto-resolve the alerts in BigPanda based on the expiration time defined for the alert in Splunk. This helps you keep your BigPanda incident feed clear and keeps your team focused on solving incidents that matter.
Splunk Data Model
BigPanda normalizes the search alert results into multiple BigPanda alerts. Each of these results becomes a BigPanda alert where the data from Splunk is turned into tags. You can use tag values to filter the incident feed and to define filter conditions for Environments.
The primary and secondary properties are also used during the correlation process. The incident_identifier used for deduplication is generated from the _bkt and _cd internal fields. If these are not present, the primary and secondary properties or their overrides will be used.
Standard Tags
| Tag | Description | Attributes |
|---|---|---|
| host | The host of the Splunk search result | Default Primary Property (pre-OIM) |
| search_name | Name of the search in Splunk. | Default Secondary Property (pre-OIM) |
| splunk_source | Source field value in the first result row of the Splunk search, if available | |
| server_host | Host name of the Splunk server | Splunk uses server_host as the default Primary Property if it doesn’t find host (pre-OIM) |
| server_url | Management port of the Splunk server, identified by host, port, and protocol | |
| app | Name of the Splunk app that contains the alert | |
| results_link | Link to the search results in Splunk | |
| results_file | Path to the raw results in a CSV file on your Splunk server | |
| Additional Attributes (Varies) | If available, a tag for each additional data field in the search results from Splunk |
Primary Property (pre-OIM)
Each alert must have a primary property specified. If not all Splunk alerts have a host associated, you may need to override the Primary Property. BigPanda will default to use the server_host if a host is not defined, but it is recommended to set up an override if hosts will not be defined.
See the Override Alert Tags section to learn more about configuring an alternate Primary Property. If using the OIM framework, please use the configuration page in BigPanda to define this property.
Install the Integration
The Splunk integration can be installed in 3 ways:
- From the Splunk Web Page
- Within Splunk Enterprise using Splunkbase
- Using CLI
Before You Start
- Create an integration in BigPanda for Splunk
- Have Admin permissions in Splunk
- Users who own searches sent to BigPanda must have the
list_storage_passwordspermission in Splunk
* If users cannot be granted this permission, then Splunk can be configured with credentials provided via environment variables instead of the config page. See the Configure Alternate Permissions section to learn how.
Install the BigPanda Splunk Add-on from the Web Page
- From the Splunk Web home page, click the Apps gear icon.
- Click Install Apps.
- Select Install to install an app. If the app that you want is not listed, or if the app indicates self-service installation is not supported, contact Splunk Support.
- Follow the prompts to complete the installation.
Install BigPanda Splunk Add-ons from within Splunk Enterprise
- Download the BigPanda for Splunk add-on from Splunkbase
- If you are using a distributed Splunk search environment with multiple instances please install the app on your search head instance*)
- Log into Splunk Enterprise
- On the Apps menu, click Manage Apps
- Click Install app from file
- In the Upload app window, click Choose File
- Locate the .tar.gz file you just downloaded, and then click Open or Choose
- Click Upload
- Click Restart Splunk, and then confirm that you want to restart
Install the Splunk Add-on directly into Splunk Enterprise through CLI:
- Download the BigPanda for Splunk add-on from Splunkbase
- If you are using a distributed Splunk search environment with multiple instances please install the app on your search head instance*)
- Put the downloaded file in the $SPLUNK_HOME/etc/apps directory
- Untar and ungzip your app or add-on, using a tool like tar -xvf (on *nix) or WinZip (on Windows).
- Restart Splunk
Use the Splunk Deployment Server for Distributed Search Environments
When installing the BigPanda app in a Splunk distributed-search environment, Splunk does not automatically propagate the app to all nodes in the cluster, and the app must be installed on each node in the cluster either manually or through the deployment server.
Search Head Clusters
To deploy apps to a search head cluster, you must use the deployer. The deployer is a Splunk Enterprise instance that distributes apps and configuration updates to search head cluster members. The deployer cannot be a search head cluster member and must exist outside the search head cluster. See Use the deployer to distribute apps and configuration updates in the Distributed Search manual to learn more about the role of a deployer instance.
You cannot push an application with predefined credentials to a clustered search head in Splunk. To get around this, you have 2 options:
- Push application from deployer to search head cluster without credentials – then manually enter the credentials afterwards via the UI
- Push application from deployer to search head cluster with credentials in plain text (not encrypted)
When pushing the credentials from deployer to the search head cluster, they are sent in plain text, and then Splunk will automatically encrypt the values when the search heads reload with the new app/changes.
Configure the Integration
Users who own searches which are sent to BigPanda must have the
list_storage_passwordspermission in Splunk. Alternatively you can set permissions through environment variables. See Configure Alternate Permissions
The Splunk integration can be configured in 2 ways:
- Through the BigPanda App Configuration Tab
- Using the CLI
Configure Through the Configuration Tab
- Open the BigPanda app in Splunk and navigate to the Configuration > Global Settings tab
- Fill in your BigPanda App Key and API Token (BigPanda Bearer Token) inputs
- (Optional) Add a Basic Auth header in the
Authorization Overridefield. This may be required by a third-party server when routing traffic through it. - Click Save
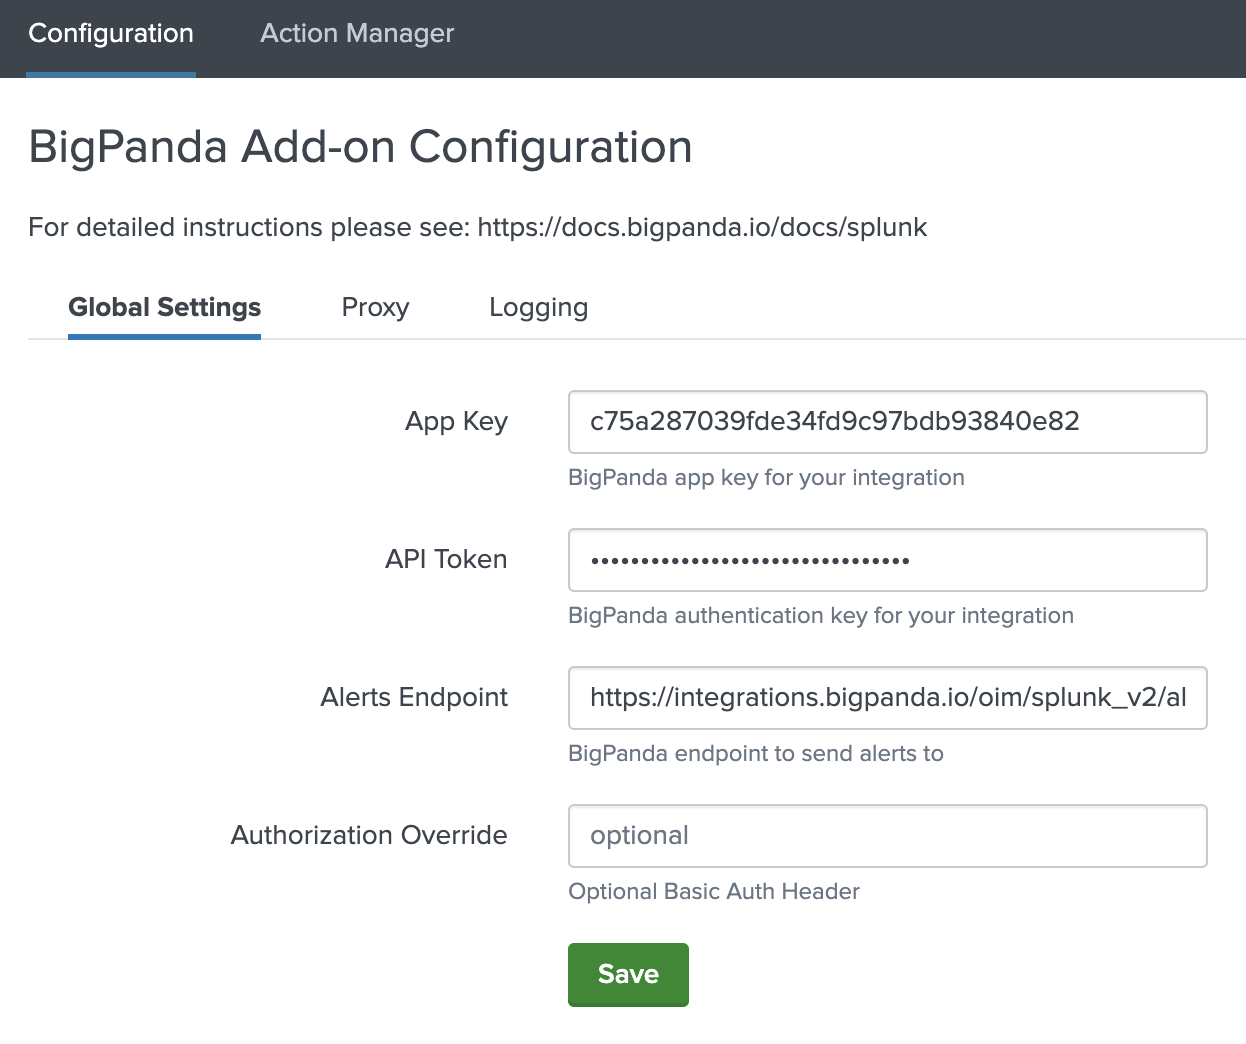
Global Settings in the Configuration Tab
- (Optional) If you are using a Proxy, enter the Proxy information in the Proxy tab
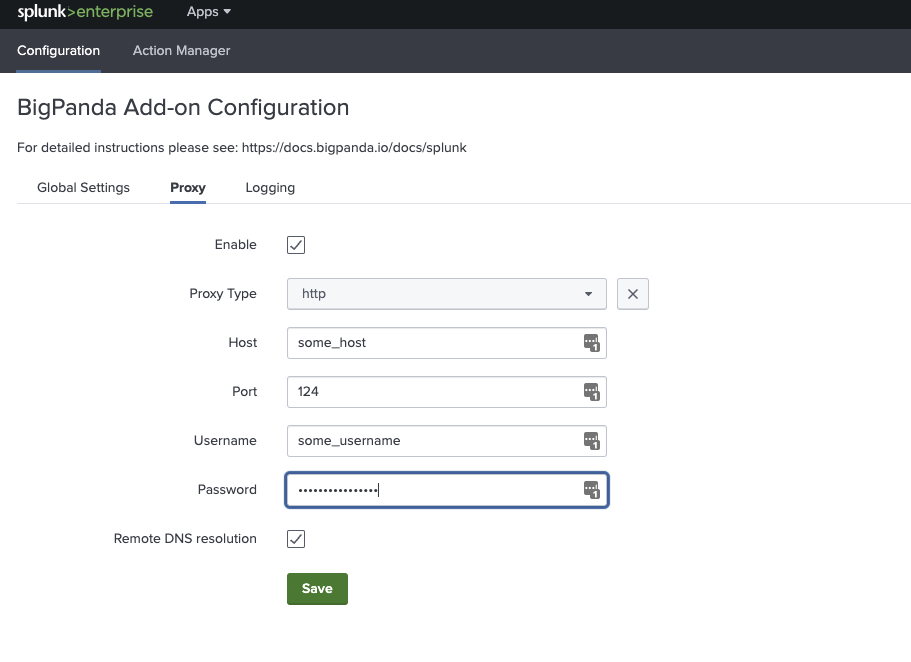
Proxy Options in the Configuration Tab
- Navigate to the Action Manager page and configure which alerts to send to BigPanda
Configure Through the CLI
- Ensure there is no $SPLUNK_HOME/etc/apps/TA-bigpanda/local/passwords.conf file
- Create $SPLUNK_HOME/etc/apps/TA-bigpanda/local/ta_bigpanda_settings.conf with the following:
[additional_parameters]
api_url = https://integrations.bigpanda.io/oim/splunk_v2/alerts
app_key = app_key_here_in_plain_text
token = bearer_token_here_in_plain_text
- (Optional) Configure a Proxy through the CLI
You can also set the proxy through the CLI. All you need to do is create ta_bigpanda_settings.conf at $SPLUNK_HOME/etc/apps/TA-bigpanda/local/ta_bigpanda_settings.conf. If it already exists then all you need to add is the following stanza:
[proxy]
proxy_password = XXXXXXXXXXXXXX
proxy_port = PORT_NUMBER_HERE
proxy_rdns = 1 | 0 (1 = enabled, 0 = disabled)
proxy_type = http | socks4 | socks5
proxy_url = URL_HERE
proxy_username = USERNAME_HERE
proxy_enabled = 1 | 0 (1 = enabled, 0 = disabled)
- Navigate to the Action Manager page and configure which alerts to send to BigPanda
Configure Alternate Permissions
Instead of using the Splunk search owner permissions, you can configure BigPanda to use environment variables instead. These environment variables can be set by the system administrator or configured in /etc/splunk-launch.conf
These variables will provide the BigPanda bearer token and bypass the search owner permission:
BIGPANDA_USE_ENV_PASSWORDS=true
BIGPANDA_BEARER_TOKEN=XXXXXXXXXXXXXXXXXXXXXX
If you are using a proxy then you also need to setup the following ENV variable:
BIGPANDA_PROXY_PASSWORD=XXXX
Alternate permissions will only work with Splunk Enterprise and are not supported for Splunk Cloud.
Send Alerts to BigPanda
Once BigPanda is configured in Splunk, and the BigPanda action has been configured for alerts, you will need to enable the alerts to send to BigPanda.
When defining Trigger Conditions for Alerts to send to Bigpanda, make sure to select the Trigger as Once. BigPanda will extract all individual events from the search results as unique alerts, and does not need to send for each result.
There are two types of saved searches in Splunk: alerts and reports. You can only use the add-on with alerts that you created, or that were shared with you by the owner.
The alert does not automatically start triggering when the add-on is used. The user must manually enable the alert for it to begin working.
Enable alerts using either the Action Manager, or Search Commands.
Action Manager
The Splunk Action Manager lists all alerts that have been created from previously saved searches. Each of these alerts can be enabled or disabled to send to BigPanda based on the configuration of the alert.
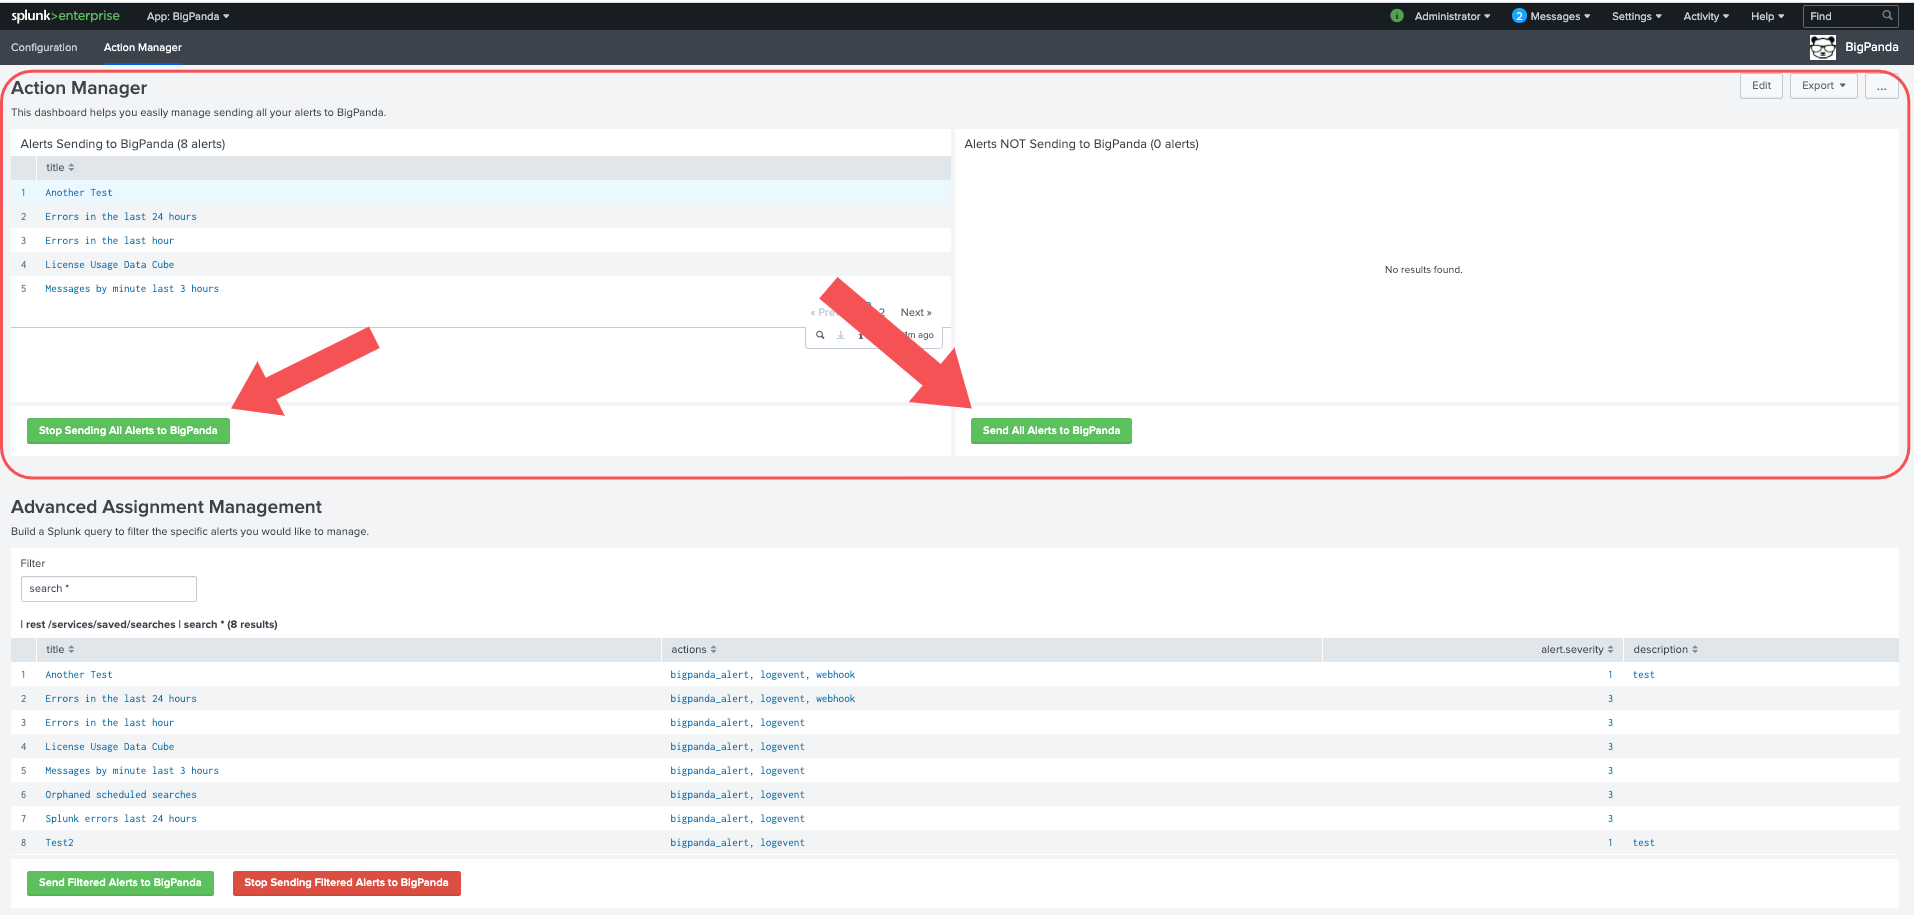
Basic Action Manager
- Navigate to BigPanda > Action Manager
- The top left panel lists alerts that are currently enabled to send to BigPanda. The top right panel lists any alerts that are not enabled.
- Click Stop Sending All Alerts to BigPanda to disable all alerts from sending to BigPanda
- Click Send All Alerts to BigPanda to enable the alerts listed in the left pane to send to BigPanda
️
The Send All Alerts to BigPanda option will attempt to send every search return for each saved search. For Splunk instances with a high volume of saved searches, this may result in oversized payloads that fail to be processed by BigPanda. Any payload over 6 MB will fail to process with BigPanda.
We recommend reviewing your saved searches to ensure that only actionable, useful information is being sent to BigPanda. See the FAQ How do I make my monitor saved searches actionable? for more information.
Click any of the alerts on the Action Manager to open up the alert and see configuration settings and the original search query.
Advanced Action Manager
The advanced action manager allows you to enable or disable a subset of alerts using a query filter.
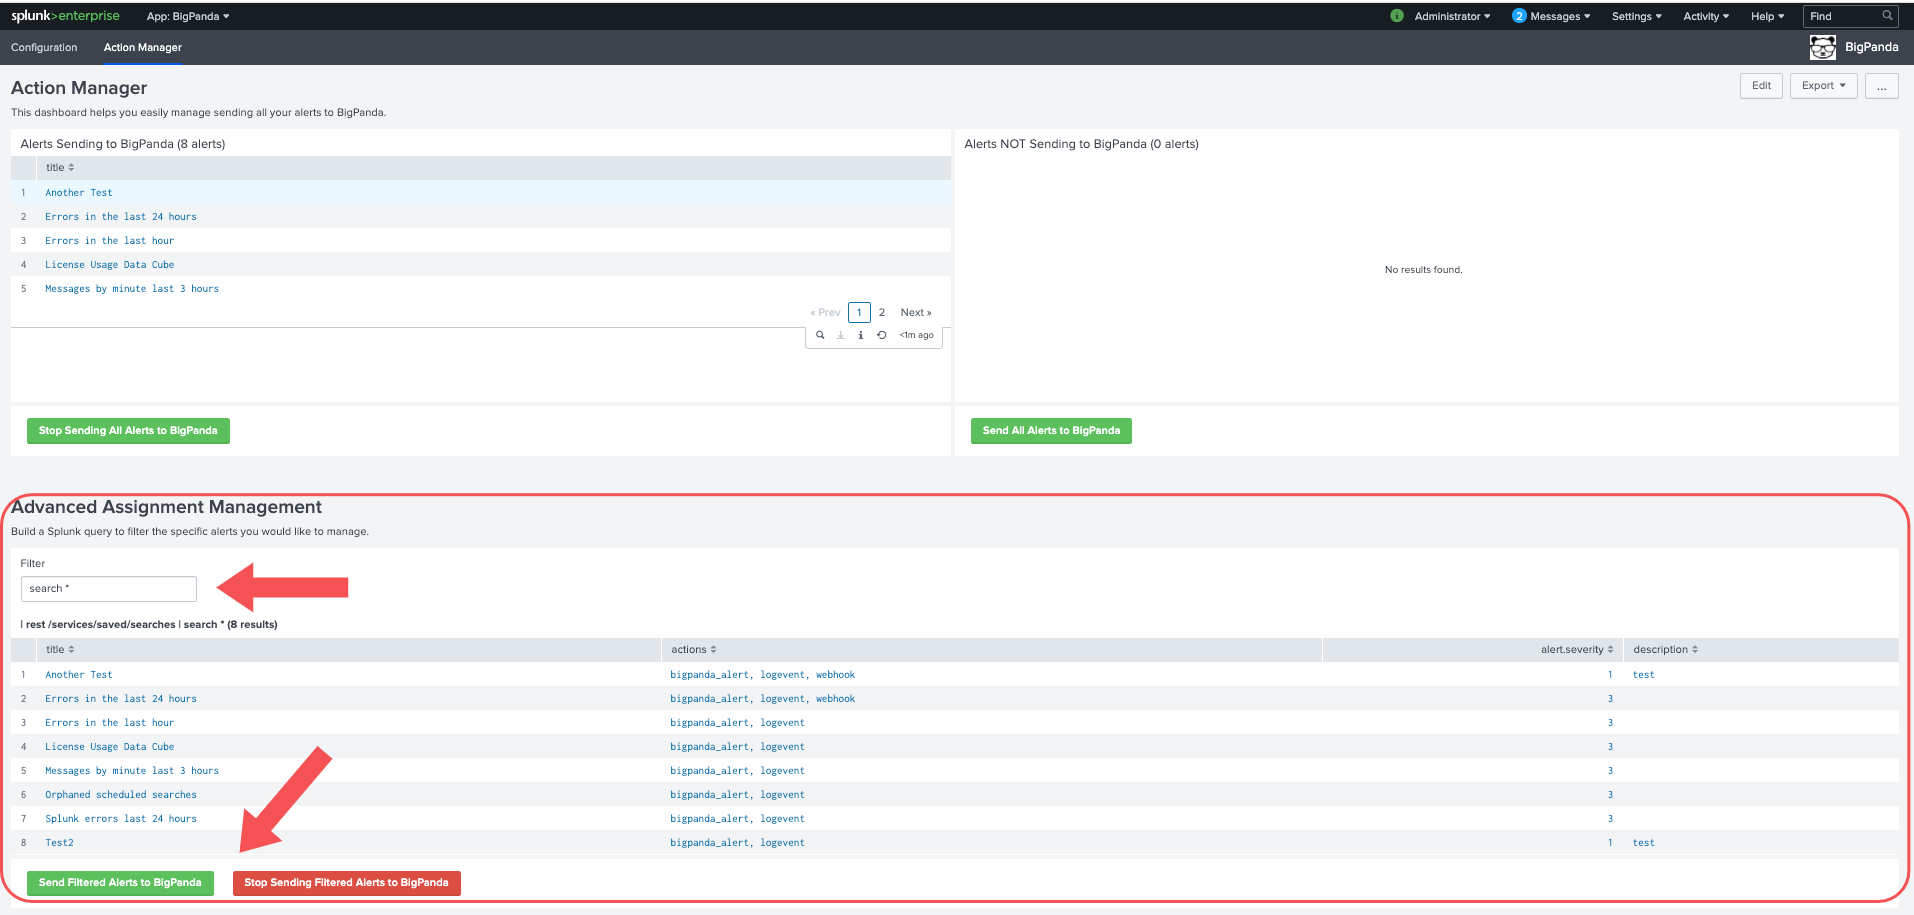
Advanced Action Manager
- Enter a search value into the Filter text box to narrow the list below to only alerts that fit that value
- Click Send Filtered Alerts to BigPanda to enable all alerts listed to send to BigPanda.
- Click Stop Sending Filtered Alerts to BigPanda to disable all alerts listed from sending to BigPanda
Search Commands
BigPanda also provides search commands to stop or start sending alerts to BigPanda. The two available search commands are addbigpanda and removebigpanda.

BigPanda Search Commands
- In Splunk, Navigate to Search & Reporting
- In the search bar do a query following this search structure:
| rest /services/saved/searches | YOUR FILTER | SEARCH COMMAND - This may return saved Report entities in addition to saved Alerts. To ensure that only Alerts are displayed, add
| search alert_threshold!=""to your search command.
Search Commands in a Distributed Cluster
When using a distributed cluster, you must be logged into the captain node to be able to successfully use the BigPanda Search Commands. If you are logged into a different node you will receive authentication errors when attempting the BigPanda Search Commands
The action manager relies in the backend on the BigPanda search commands addbigpanda and removebigpanda
Customize Splunk Alerts
For any Splunk alert that is sent to BigPanda, you can define a custom description, primary property, or secondary property. If you have more than one Splunk integration with BigPanda for testing or environment management, you can also specify which integration to use for a given alert.
Customizing the alerts is especially useful if your Splunk alerts do not always include the default information such as the host. BigPanda will default to using the server_host if a host is not defined, but it is recommended to set up an override if hosts will not be defined.
Override Alert Tags
This section is not required if you are using the Open Integration Manager framework with Splunk. If you are using OIM, please use the configuration page in BigPanda to define these properties.
The default Description, and Primary and Secondary properties can be overridden by defining custom alert variables. All variables will continue to be sent with the Splunk payload, but these key correlation fields will use these alternate variables.
- From the Alerts page in Splunk, select an alert to open its detail page, and then use the Click to edit actions link.
- (Optional) Alternatively, run a search, and go to Save As > Alert.
- At the bottom of the window, click Add Actions, and then select BigPanda.
- Enter the custom alert values you want to send to BigPanda when the alert is triggered.
| Field | Description |
|---|---|
| Primary | Adds a custom tag with the name custom_primary and the value specified. You can use Splunk variable names in the alert value. If defined, this tag is treated as the primary property for alert correlation and in the incident title. |
| Secondary | Adds a custom tag with the name custom_secondary and the value specified. You can use Splunk variable names in the alert value. If defined, this tag is treated as the secondary property for alert correlation and in the incident subtitle. |
| Description | Overrides the alert description. You can use Splunk variables in the description value. The default description is the search name. In addition to the alert variable names, the description field can be populated with alert variable values. |
Custom tag fields are optional.
The incident_identifier used for deduplication is generated from the _bkt and _cd internal fields. If these are not present, the primary and secondary properties or their overrides will be used. If using the OIM framework, please use the configuration page in BigPanda to define this property.
Use Splunk Variables in Custom Tag Values
When overriding Splunk alert tags in BigPanda, customers can leverage any search data that is available as a Splunk Token, including search metadata and values from the first row of the search results.
To override alert tag values, a variable name or value must exist in the payload to BigPanda. If the override variable is not found, BigPanda will use the default values for that field.
- To override with search metadata, use the name of the variable. For example,
sourceorsourcetype - When overriding Description, you are also able to override using field values, using the format
$result.<fieldname>$ - For example, if search=
hello: If you enterhostin the description field it will display onlyhost. If instead you enter$result.host$the description will be the host forhello. - Any of the Splunk alert fields can be added to the Splunk search.
- Adding alert fields to the override fields will make the data available as a variable
To override alert tag values, a variable name or value must exist in the payload to BigPanda. If the override variable is not found, BigPanda will use the default values for that field.

Custom Field Values
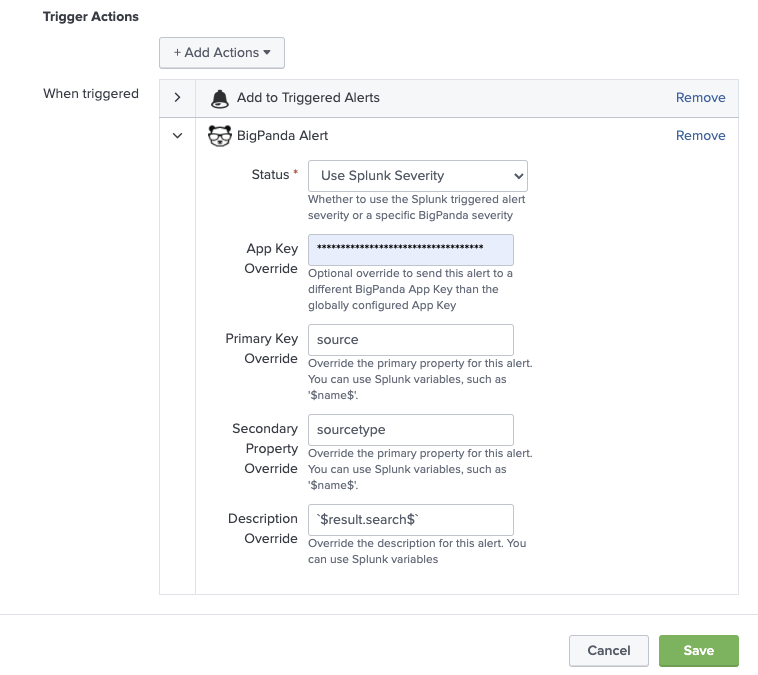
Splunk Variables as Overrides
Deactivate the Integration
If you want to stop sending data to BigPanda but don’t want to delete your integration, you can temporarily deactivate it.
To deactivate an inbound integration:
- In BigPanda, navigate to the Integrations tab and select the desired integration from the list. This will open integration details on the right side of the window.
- At the top of the integration details, click the Active/Inactive toggle next to the application name to change the status of the integration.
Alert Resolution for Inactive Integrations
Any active alerts belonging to an inactive integration must be manually resolved or they will stay in the system until the auto-resolve window is reached.
Uninstall the Integration
Deleting an integration requires changes to both the integrated system and BigPanda. You must uninstall the integration on the integrated system and then delete the integration from BigPanda.
When replacing an existing integration with a new tool or system, we recommend configuring the new integration first to ensure no data is lost.
Stop Sending Data to BigPanda
Within the integrated system, disable any settings that send data to BigPanda.
Each system requires specific changes to disable the integration with BigPanda. For example, you must delete the topic in CloudWatch, and you must disable the alert channel in New Relic. To determine the changes for your integrated system, reference the relevant documentation or contact BigPanda support.
Delete the Integration from BigPanda
- In BigPanda, navigate to the Integrations tab and select the desired integration from the list.
- In the integration details on the right of the page, click the trash icon, then confirm you want to delete the integration. The integration will then be removed immediately.
Alert Resolution for Deleted Integrations
All active alerts from the integration will be resolved after deletion.
️Data Removal
This procedure does not remove any data from the integrated system.
FAQ
I have applied the BigPanda add-on to all the saved searches, why am I not getting data?
There are a few reasons why you may not be getting an alert. One of the most common is that when you apply the add-on to your saved searches, it does not automatically enable the alert. You need to enable the saved search for it to start sending data to BigPanda.
Another reason is that a saved search can be an alert or a report, but only alerts trigger in BigPanda. If you want a report to work with BigPanda, you need to convert it to an alert.
If you are still not seeing data come through, it might be because the alert is returning too many results, taking too long to process, or it may not be making it to BigPanda. See the FAQs below on how to make a saved search actionable.
What are saved searches and how does BigPanda use them for alerts?
Saved searches save the search criteria, rather than the full search itself. You can use saved searches to create alerts that will trigger when certain conditions are met.
The two types of saved searches are alerts and reports. Alerts are triggered on intervals and can also trigger other actions, such as sending an email or logging a Splunk event. Reports don't trigger any other actions, but they can still be useful for alerting you to something important.
BigPanda focuses only on the alert saved search type. Alerts allow you to send searches using the add-on action in order to appear in the BigPanda console.
BigPanda also distinguishes between non-actionable alerts and actionable alerts. Non-actionable alerts return more than 10 results when triggered and can contain INFO logs. Actionable alerts return a max of 10 results per trigger and are intended to provide useful information about what's happening. Ideally, these would not return any search results since each returned search result is considered an alert of an issue.
What makes a saved search monitor and its alerts actionable?
Actionable alerts are those that a user can act on. The saved search alert should return fewer than 10 results in each trigger. When you have too many results, it's hard to focus on the ones that are most important and need your attention. Alerts with more than 10 results in each trigger are considered noise and are not actionable.
You need to be able to filter the search query to hone in on the results that provide information about your systems health and should only return if an alert should trigger. The saved search alert query is generally considered actionable if it indicates that something needs to be fixed.
How do I make my monitor saved searches actionable?
Making your saved search alerts actionable can be a challenge. Here are some easy things you can do to ensure that you are focusing on the most actionable saved search alerts:
1. Filter your results
You can easily focus on the things you want by filtering your results to what matters to you.
Use the following filter: YOUR SEARCH | search value="Value to filter on"
2. Filter out the INFO log_level
You can use filters to drop any result that contains the log_level INFO, allowing you to remove noise and make it easier to send data over.
Use the following filter to remove the log_type INFO: YOUR SEARCH | search NOT [log_type="INFO"]
3. Dedupe your results
You can dedupe results that contain the same value by using the following filter: YOUR SEARCH | dedupe value 1 value 2 .... value N
4. Return the top N results
If you are getting similar results and only want the latest one, you can use the following to reduce the returned results by N: YOUR SEARCH | head N
I have installed/upgraded the latest version of the BigPanda Splunk app, but it is not working
To ensure that your BigPanda Splunk app is properly installed, check the compatibility of the application and version of your Splunk instance. If you have confirmed that BigPanda works with your version of Splunk, you may have to restart for the changes to persist.
If that does not work, we recommend deleting the BigPanda app, restarting, and then reinstalling the application.
Release Notes
v2.1.6 (11/21/22)
- Added Basic Auth header support
v2.1.5 (7/25/22)
- Updated Add-On Builder to 4.1.1
- Fixed JQuery version issue for Splunk Cloud support
- Updated splunk-sdk for python to version 1.7.0
v2.1.4 (1/20/22)
- Fixed typo in action management dashboard
v2.1.2 (1/10/22)
- Support for replicating configuration in clustered search head environments
- Removed extraneous warning messages for Splunk cloud
v2.1.1 (12/1/21)
- Upgrade potentially unwanted HTTP calls to HTTPS when running search commands
v2.1.0 (10/26/21)
- Fixed issue with the alert assignment management feature
- Updated the default endpoint in the application
v2.0.0 (9/9/21)
- Support sourcing of API credentials via environment variables
- Update with support for Splunk Add-on Builder v4.0.0
v1.0.0
- Initial release 🎉
Updated about 1 month ago
